New Year, New Me
Lesson Focus:
Students will learn how to construct a human face using pre-cut facial features and a glue stick. Students will understand collage methods and learn how certain shapes can be assembled to represent a human face.This will be accessible to all students because the facial features will be cut prior to the activity and hand-over-hand assistance can be provided for students who need additional help applying glue to the paper or adhering pieces of paper together.Grade Level:
K-1 Standards and Objectives:
NYS Learning Standards in the Arts.
VA.Cr.2.1.1a - Explore uses of materials and tools to create works of art or design.VA.Cr.2.2.1a - Demonstrate safe and proper procedures for using materials, tools, and equipment while making art.VA.Cr.3.1.PKa - Share and talk about personal artwork.VA.Re.7.2.Ka - Describe what an image represents.
Learning Objectives.
Students will be able to understand what a collage is and how one is made through teacher explanation and demonstration.Students will be able to create a collage using pre-cut pieces of paper and glue.Students will be able to build a representation of a human face using the collage methods learned.
Academic Language Demands.
Collage (noun) - an artistic composition made of various materials glued on a surface.Image (noun) - a visual representation of something.Background (noun) - the scenery or ground behind something.Tool (noun) - a handheld device that aids in accomplishing a task.Facial feature (noun) - a distinguishing element of a face.Representation (noun) - something that represents an artistic likeness or image.Adhere (verb) - to hold fast or stick by gluing.Assemble (verb) - to bring together; to fit together the parts of.Iris (noun) - the opaque contractile diaphragm perforated by the pupil and forming the colored portion of the eye.Sclera (noun) - the dense fibrous opaque white outer coat enclosing the eyeball except the part covered by the cornea.Pupil (noun) - the contractile aperture in the iris of the eye.
Materials:
Pre-cut shapes that resemble facial features:Head/Face shapes in multiple colorsCircles in multiple colors (for the irises)White almond shapes (for the scleras)Nose shapes in multiple colorsUpper lip shapes in multiple colorsLower lip shapes in multiple colorsEyebrow shapes in multiple colorsHair silhouettes in multiple colorsEar shapes in multiple colors
Colored paperGlue sticksMarkersScissorsTrays to separate the pre-cut facial features
Procedures and Timeline:
Prior to the Lesson
Cut out facial features using different colors of paper and scissors.Separate the facial features into different trays and label the trays based on the facial feature (i.e. faces, noses, ears).Prepare the tools the students will use so you can lay them out after they are ready to begin the activity.Create a teacher sample that represents your own face or an imagined one.
Motivational Hook (10 minutes)
After greeting the students, hold up your teacher sample in front of your face.Ask the students, “What does this look like to you?”Let the students provide you with answers by calling on students who raise their hand to participate.Ask the students, “Does this look like me?”Ask them “Why?” or “Why not?”Provide leading questions if necessary:“Is my hair blue?”“Do I have three eyes?”
Inform the students that they will get to create their own face today using an art method called ‘collage’.Teach the students what a collage is and how one is created.A collage is created by cutting out pieces of paper and gluing them onto a larger piece of paper to create a new image.
Show the students physical or digital examples of collages by other artists.Demonstrate what the students will be doing during the activity.First, you’re going to select a piece of paper to use as the background for your art piece.Choose a colored piece of paper to use for your demonstration.
Next, prepare the tools you’re going to use to create your art collage.Today, you’re going to need a glue stick to adhere the pieces of paper together.Hold up a glue stick so that the students can see and place it on the table in front of you.
Once all of your pieces are glued together, you may use markers or a pair of scissors and paper to add on more details if you’d like. I will demonstrate how this can be done after I’ve assembled my collaged face.You will also need facial features to build your collaged face. Within these trays, I’ve organized the shapes you will use for your head, eyes, eyebrows, nose, mouth, ears, and hair.Hold up each tray while pointing at the labels to clarify which facial features are where.
I’m going to pick out the ones I would like to use to create my collaged face.Remind the students that they’re allowed to be creative and that they don’t have to choose the facial features that represent their own face if they don’t want to.You can collage a face that resembles your own, or you can be creative and use your imagination to come up with an entirely new face.
First, I’m going to pick a head shape and glue that onto my piece of paper.Next, I’m going to pick up two eyeballs for the white parts of my eyes. In science, these are also called scleras.Glue these pieces onto the upper half of the head shape.
Now, I’m going to choose two of these circles to be the colored parts of my eyes which are called irises.Glue these pieces onto the center of each sclera.
Continue on until you’ve chosen pieces for the eyebrows, nose, lips, hair, and ears and have glued them each on one by one consecutively.
Once you’ve assembled your collage, hold it up so that the students can see. Ask the students, “Now that I’ve glued my pieces together, is there anything missing that I should add to my art piece to make it look more complete?”Let the students name things that you should add onto your collage. You can use markers or cut out additional pieces of paper if need be.If no one has mentioned it yet, ask them if there’s something missing within the eyes.Within our eyes, we have a black dot or hole in the middle that allows us to see. This is called a pupil.To create this, I’m going to take a black marker and draw a dot within the center of the irises.Take a black marker and demonstrate drawing in the pupils.
Hold up your finished collage so the students can see.Now, I’ve finished creating a collage of a face.Ask the students if they have any questions before it’s their turn to try out the activity.
Learning Activities (20 minutes)
Set enough materials and tools out on their tables for each of them to use.Let the students begin creating their collages.Walk around the classroom and check in on how the students are doing.
Closure (10 minutes)
Ask the students to start cleaning up (i.e. throw out any trash, put materials and tools away).Remind the students to write their names on the front or back of their art piece.If time allows, ask the students if anyone would like to share their collage with their classmates.Have students raise their hands if they would like to share.Talk about their collage and the choices they made to create it.
Assessment:
Formative Assessment.
Adhere pieces of paper together using glue and appropriate manual pressure.Uses the provided materials and tools to complete the assigned activity.Actively listens to the teacher’s demonstration, instructions, and peer discussions.Use art materials appropriately and return them to their proper storage area after use.
Summative Assessment.
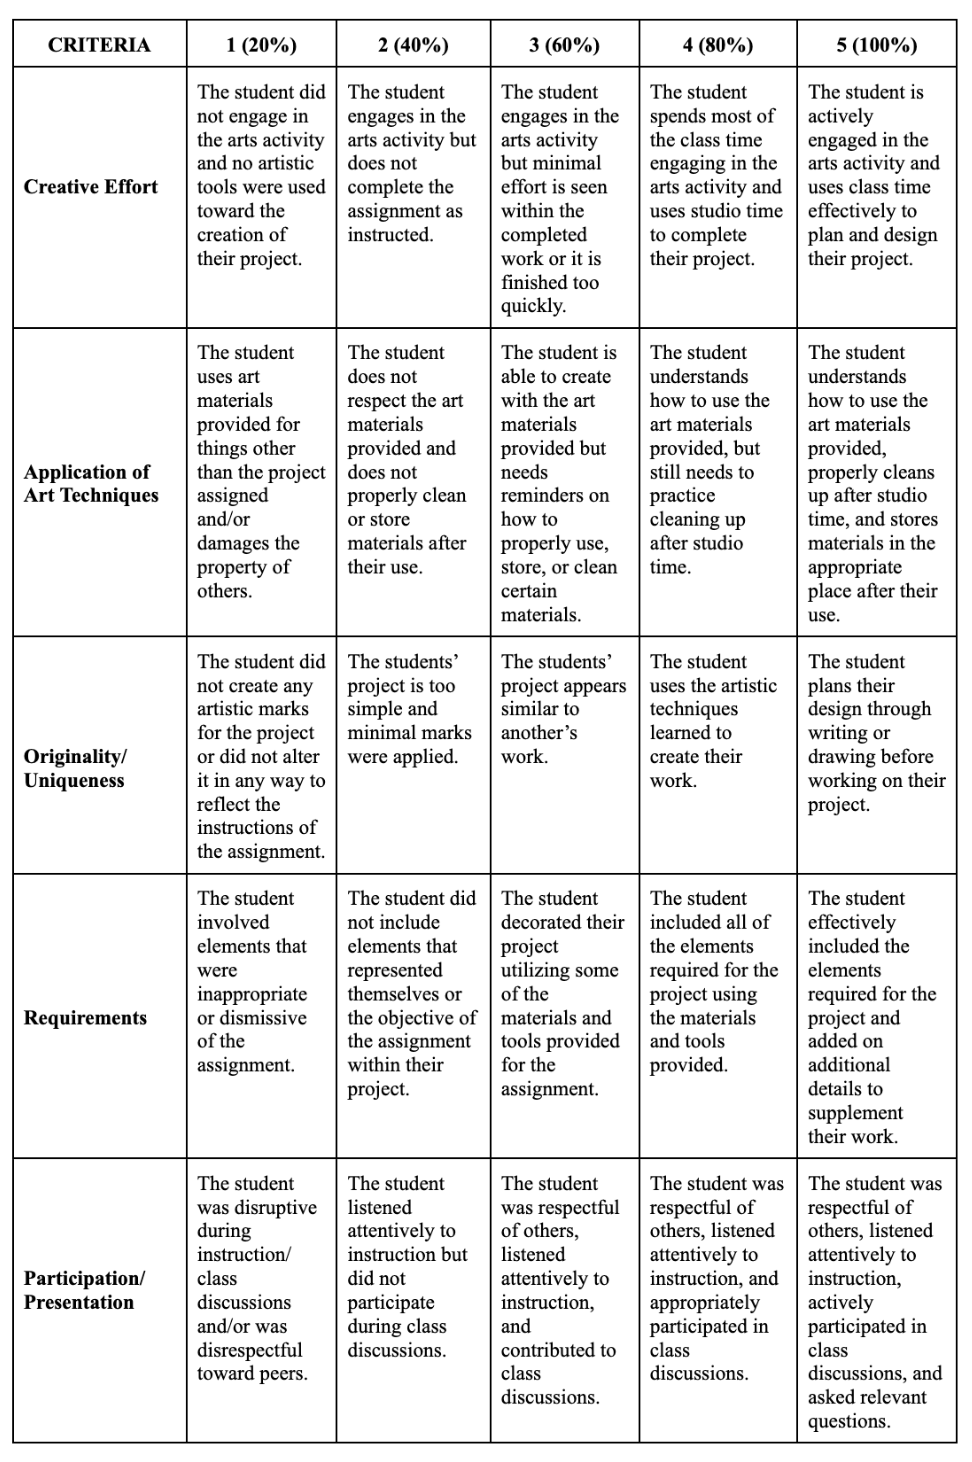
Explain what a collage is and demonstrate an understanding of how collages are created.Creates a completed collage that meets the assignment requirements.Constructs a recognizable representation of a face using the provided collage materials.Follows classroom expectations by listening attentively, following directions, and showing respect toward peers.Cleans their workspace and properly stores materials before leaving the classroom.
Rubric/Scoring Guide.
Accommodations:
Students will be able to use their communication devices or PEC sheets according to their IEPs.An area of the arts classroom is designated as a “Calming Corner” that may be used by students who feel overwhelmed or need a break. A timer can also be set if appropriate and useful.Another area of the arts classroom contains a sand box and other sensory materials for students to engage in if finished early or need a place to relax before returning to the activity.
Teaching assistants may support students with hand-over-hand approaches for those who have this accommodation listed within their IEPs.Further discussions will be held with the student’s classroom teacher and/or teaching assistants to assess any other suggestions for accommodations.
There are no restrictions placed on how their completed artwork should look.Students will be informed in advance of the date for when they begin working on this project so that they are aware ahead of time without any surprises.A countdown timer will be set and music will be played so students are aware of the time they have to work as well as feel more comfortable and engaged in the artistic process.Students will be seated next to each other, preferably at the same table, in order to encourage peer interaction and improve their social and communication skills.